SFXs Styling: Pattern Overlay
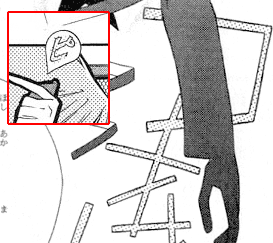
Some SFXs will have a dot pattern either around them or filling them. Two examples:
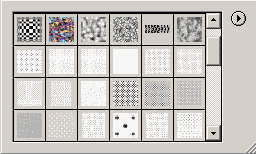
Instead of manually trying to clone this pattern, you can approximate it instantly using a Photoshop pattern. First you need to install the pattern file into your Photoshop. Download it here (1.2mb). (I didn't make these patterns, and forgot where I got them ~ if anyone wants credit, I'll be glad to give it.) Extract the .pat file from the zip and open up Photoshop. Select any text layer, right click it and choose "Blending Options...". In the box that pops up, choose "Pattern Overlay". Click the down arrow next to the pattern. Click the small arrow pointing to the right on the next box that pops up, and choose "Load Patterns" (click to see all this). Browse to find the .pat file you just downloaded and Load it. You'll now have lots of new black and white dot patterns in your pattern box.
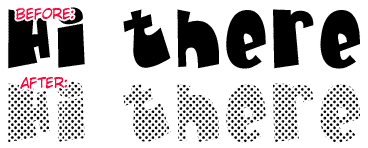
The different patterns vary in how big the dots are and how close together they are, so you'll need to experiment to see how each looks on text. To add a pattern to the text, just click on one of them and Okay out of the Layer Style box. Your text will now be filled in with the selected pattern:
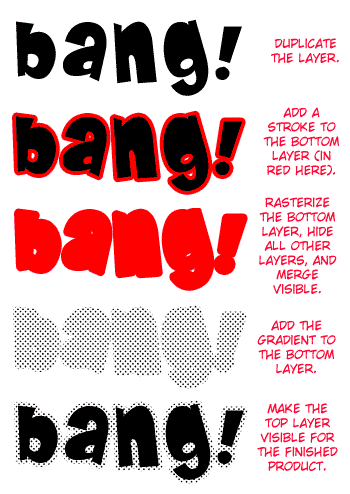
Done. Now, pattern strokes are more difficult (and much rarer), but they're really just a combination of three things you've already learned. First you'll need to duplicate the SFX, and add a stoke on the bottom layer. Then hide all the layers (including the background) except the bottom sfx layer. Rasterize the bottom layer, and merge visible to turn this stroke into a sticky stroke (gone over in detail in the previous section). Finally, add the pattern overlay to the bottom sfx layer, and make the top one visible. To visualize this:
That's probably more about SFXs than you'll ever need to know. Just be patient when you're doing your SFXs, and try to keep them as close to the original as possible.
To Practice/Tests :: SFXs ->
To Post-Editing :: Credits ->