Anti-aliasing Guide
For our cleaning purposes, anti-aliasing is very simple and straightforward. Anti-aliasing makes an otherwise jagged line smooth. Period.
It’s probably best explained with pictures. First, for the Line Tool, the option box for anti-aliasing is at the top of the window:

[/spoiler]
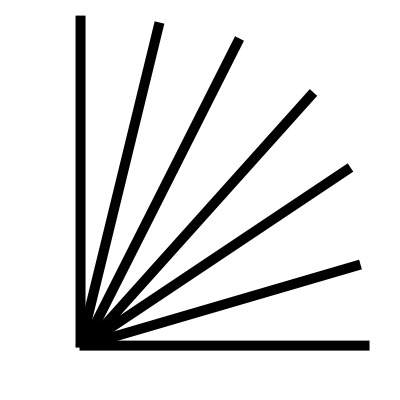
These lines were created with the Line Tool with the anti-aliased box NOT CHECKED:
[spoiler]

[/spoiler]
These lines were created with the Line Tool with the anti-aliased box CHECKED:
[spoiler]
[/spoiler]
See how the first example had jagged edges where you can see ‘steps’ in the line? See how the second example has extra gray pixels that smooth out the line?
Here is a close up of those lines overlapped:
[spoiler]

[/spoiler]
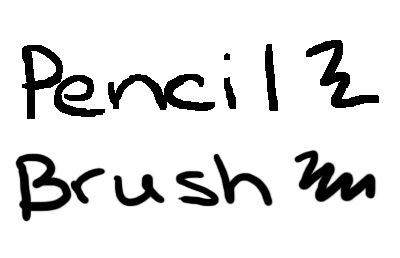
Pencil vs. Brush:
The Pencil Tool IS NOT anti-aliased and will give you jagged lines. All pixels colored with the pencil tool will be 100% the color in your foreground swatch (i.e. all black with no gray pixels).
The Brush Tool IS anti-aliased and will give you smooth lines. Some pixels will be lighter than the color in your foreground swatch (i.e. mostly black with gray pixels along the edges).
[spoiler]
[/spoiler]
Other tools with an Anti-aliased checkbox:
- Lasso
- Magic Wand
- Paint Bucket
- All the other shapes (Circle, Square, etc)
- It’s implied in the Text options (the “smooth” setting = anti-aliasing)
- Probably more that I haven’t noticed….
Point is that anti-aliasing everywhere so definitely keep it in mind!!
This is very needed. Much better than other definitions online. Will keep in mind, thanks! :)
Man, this is what I’ve seaarched for months! Thank you very much for you detailed and well explained tutors!
wher can i find the anti-aliased option is soes not appear beside the opacity, instead of that o got something like flujo.
Anyway does i got to do something to make it appear?
Which tool are you using? Sometimes, the location of the anti-aliasing box depends on the tool, but in general it’s in the toolbar at the very top of the window.
I can’t find the anti-aliasing option, too. I’m using the line tool, brush tool and pencil too. It doesn’t appear in the toolbar at the top. I only found the anti-aliasing checkbox in the color replacement tool. Where do you think I can find it? I’m kinda lost here and needs some help. :)
The brush and pencil won’t have the anti-alias option since by nature, brush is anti-aliased and pencil is not. For the shapes (line, rectangle, etc), you need to make sure you’ve selected “Fill Pixels.” At the top left of the shape tool bar are three icons: Shape Layers, Paths, and Fill Pixels. You want to make sure the one on the right is selected ;)