Intro to Leveling
One of the most common mistakes new cleaners make is over-leveling a page. I originally made this tutorial for Shannaro, but here I’ve edited it to be a general guide to leveling.
Each scanlation group will have different tips and tricks for precleaning and denoising a page. This tutorial is designed to give you a general understanding of what leveling is and how it works.
IMPORTANT: Before doing anything, I recommend making a duplicate layer of the raw and doing all your level adjustments on the duplicate. That way, the raw will be untouched in case you want to go back and try again.
First, open your raw in Photoshop. In the Layers window, right click on the raw’s layer (probably named “Background”) and choose “Duplicate Layer.”
Here is an example of a raw page:
[spoiler]

[/spoiler]
Pretty dull and gray, isn’t it? Leveling is a process that makes light grays look white and dark grays look black.
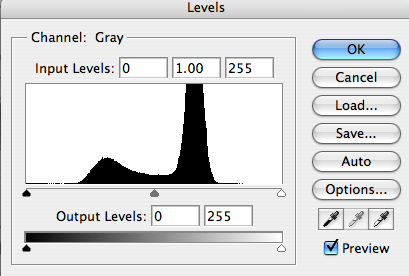
In Photoshop, go to the Image menu > Adjustments > Levels. These are the levels for the raw page:
[spoiler]
[/spoiler]
This graph shows you the distribution of pixels on your page. If there are a lot of bars on the right side, you have a lot of white. If there are a lot of bars on the left side, you have a lot of black. The middle represents grays.
Make sure the channel is set to GRAY since we are working in grayscale. If it’s not, go back and set the mode to grayscale.
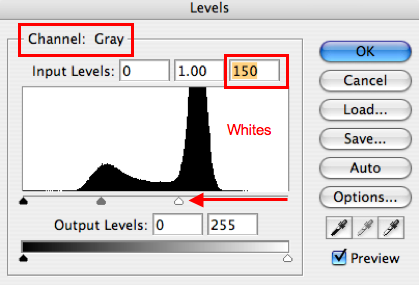
First we’ll deal with the big peak on the right side. These are the pixels that should be white, but instead look gray. Let’s make them white by sliding the little white triangle to the left. Stop near the left base of the peak. As you move the triangle to the left, the pixels that were light gray become closer to white. If you go too far, you will over-level. Notice the number in the third input box decreases from 255 as the slider moves left.
[/spoiler]
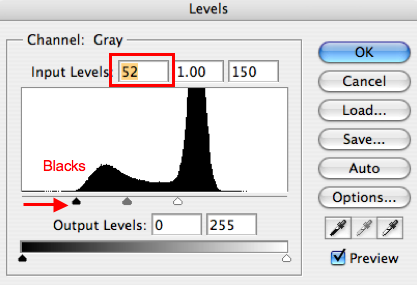
Now the page should look pretty washed out since we just made the pixels whiter. To fix this, let’s focus on the left side of the graph. Take the little black triangle and slide it to the very beginning of the black peak. This makes the dark gray pixels appear darker.
[/spoiler]
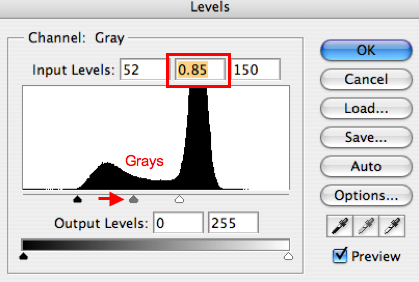
Now we need to adjust the gray slider to the right to make the whole page a little darker. Be careful because this is the easiest place to over-level! Zoom into the page and watch the lines as you adjust the sliders. You don’t want them to become too pixelated! You just want to darken them up a little.
[/spoiler]
If you over-level, then all your grays pixels are converted to either black or white, and this makes the lines look pixelated. Over-leveled blacks have a jagged look, and you can see ‘steps’ in the line. Gray pixels make lines look smooth (visit here if you don’t know what anti-aliasing is). The trick here is to remove the grays we don’t want, but keep the grays we do want.
Here are examples of what a page should look like and what it shouldn’t look like.
Good: [spoiler]

[/spoiler]
Bad: [spoiler]

If you want, layer these pages in photoshop so you can compare the differences.
Notice that there is still some dirt in the white areas. Sorry, folks, but you’ll have to remove this by hand. Same with the blacks – they will almost ALWAYS have to be inked over by hand. Don’t try to use leveling to get rid of all the dirt!
Also, when in doubt, under-level. It’s easier to fix a page that has been under-leveled than one that has been over-leveled.
Please remember that this is a basic guide to good leveling, and that different scan groups may use more complicated techniques with filters and plug-ins and such. Nevertheless, these are the basic principles of of the Leveling Window.
If you are still unsure of what OVER-LEVELING is, check out the Anti-alias Guide.
————————————
Once you feel you have a good understanding of how the Leveling Window works, try this method for precleaning your raw.
Very helpfu. Only thing is, as a person learning photoshop, finding how to turn the picture into grayscale. Once I figured that out the rest was cake.
oww.. now i’m reading this, but… its really help *-* !! in the moment, i’m novicer, but… i want study hard about everythings that enclouse .. !! thanks ^^ !!
Thanks for another informative and articulate tutors!
May i ask what kind of photoshop you use? I’m a beginner and i would like to learn, but i don’t know what type of photoshop is the best..
And do you know what the basic things you need to have if you’re editing manga for a dojinshi circle are? Just photoshop or for instance also a tablet…?
I’m not sure what a dojinshi circle is, but photoshop and a tablet is all I use. I know plenty of people who use a mouse just fine, too ;)
I’m still using Photoshop CS because it’s actually a legal copy \o/
You could use any version from CS to CS4, but I know PS7 is missing some filters that are commonly used.
For a page that has a lot of bars on the left side where is the precise position to slide the black triangle because I happened to stumble upon a page where on the left side the bars start fully from top then its kinda curve down to the bottom.
kinda off topic, but what method would you recommend for getting rid of gutter shadows?
I’m of the philosophy that cleaners shouldn’t spend a lot of time cleaning gutters. Maybe I’m just getting old and cynical, but the amount of time it takes to do a perfect gutter redraw compared to how much readers even notice… Anyway, usually what I’ll do for gutters is brush over the easy part in white. That can usually clean up a lot. Then I set the Dodge Tool to Highlights, and I dodge where possible. This can get tricky because if you lean too hard on the Dodge Tool, your line art becomes jagged and ugly. I leave grays in the gutter alone because it takes too much time to fix them. Sorry I can’t be more help, but I don’t think there’s a quick and easy way to make them perfect :-/
This is a bit out off topic, but can you make a guide on how to work with & scanlate the colour pages of a manga.
This site is very helpful in learning about scanlating of a B&W scans, but it doesn’t cover much about colour scans.
Honestly, I don’t have much experience with color pages. The few that i have done for Bleach involved basic leveling and using a Surface Blur (or Smart Blur, depending on which version of PS you have). Other than that, color pages usually don’t need as much love as grayscale pages (I think they are printed on better paper with better ink.)
omg..why do such helpful people like u exist?
thanks for ur hard work and teachings!
does the program HAVE to be photoshop?
No, it doesn’t. I know a couple people who use GIMP. You can do pretty much everything using GIMP except for certain filters and things like simulating pressure with the pen tool. I tried it a couple times because I like the idea of open source software, but the hotkeys were different and I get frustrated quickly. If you’re learning from scratch, maybe give GIMP a try since you won’t have any Photoshop habits ;)
is their a way to do this in gimp?
nm i found it
There might be some useful stuff in here, but I didn’t read the whole thread: http://www.maximum7.net/forum/index.php?topic=3439.0
Good luck!
cool! now i know.. i was having a hard eh!^_^ thankz?
cool! now i know.. i was having a hard time eh!^_^ thankz!
So, basically, you’ll know you over leveled when you begin to see distortions in the image such as white squares on black areas, pixelated or block lines that just don’t look good, and an image that looks too washed out?
Why do you put the black slider on the left side of the hump instead of the right side? Binktopia puts the black slider on the right of the black hump, and I put it in the middle of the hump. Neither of our releases look overleveled.
Nevermind, your way is a lot better.
Yes, but at first, I recommend going by the numbers and the peaks in the leveling window. They don’t lie, and it’s a good way to develop an eye for levels. But yes, stay away from jagged edges!
It has a lot to do with your filters, the size of your page, and resizing after you level. Since this is the intro to leveling, I recommend putting the slider to the left of the hump to avoid overleveling. If you use the diffuse filter method that is on this site, then you can get away with putting the black slider in the middle of the hump (the diffuse filter keeps the edges from getting too sharp).
The lines weren’t jagged. I always put the gray slider at 1.25 and it looked exactly the same as your level setting did. When I wrote that post, I THOUGHT my settings were making the darkest grays too dark, sometimes almost black. Turns out it was just my monitor not displaying grays properly.
Oh, you use a mac too, right? If it’s an Imac, you might want to check with your teammates to see if your display has the same problem. (Though I expect you would already know if it did.)
Ah gotcha. And yes, sometimes I did notice a difference in my monitor and what other people saw. For me, sometimes I would think I inked an area entirely black, and then someone would leave a comment saying that I had dark gray splotches all over. I had no idea because of my monitor! That’s when I started using adjustment layers for my final black/white check.
Gimp Works too
http://docs.gimp.org/en/gimp-tool-levels.html
Usually it’s better to put the black slider in the middle of the first wave, your scans just have messed up blacks, I don’t think I’ve seen such grey scans before…
tanks a lot for the tutorial you are good
I’m a bit new to ps but euhm…
is this how the first page should look?
http://imageshack.us/f/692/zgoy3eib.png/
Hmm… the blacks look a little overleveled. See how the edges are jagged in some places? Try not to move the black slider so far to the right ;)
oke thanks ill try to improve that :P
But this is the picture, not precleaned, so I didn’t use the replace color menu. maybe i should do that first :P. Because the graph that I got on my screen wasn’t like yours. So I’m guessing i should use the replace color menu first. And then level it out.
Btw great tutorials you’ve made. I love to experiment with PS and follow your tutorials step by step. Keep up the good work.
[…] Post: Senbozakura This blog don’t hold any right of this […]
I just wanted to know was the tutorial done is CS5? I am using CS3 and the levels box looked different from the tutorial. I just want to make sure to that if it is CS5, that I can go ahead and get it.
[…] Post: Senbozakura This blog don’t hold any right of this […]
Nice! I was used to using the eye dropper but the wave form & the numeric values were a mystery to me. not anymore :) thanks
Hi. I was wondering if Auto Levels in the Image>Adjustments option can be used to level a page quickly? Thanks.
Eh, technically you can use it, but I wouldn’t necessarily trust it to do what you want. I think the algorithms in the auto settings are usually for things like photographs. For example, it is probably set to NOT have too many pixels as pure black and white, but that’s exactly what we want for grayscale manga. It’s much better to learn to do the leveling yourself.
Wow thanks its a lot of help :P
Thank you! Extremely helpful guide as well as your other ones. =) Bookmarking this website~
well another, added info to my PS knowledge~~
Hello, uhmm.. I always use the ink dropping kinda tool with level because it makes it easier and that’s what I was taught. So, is there anything bad about that kinda leveling? I’m still a beginner and I will invade your blog for like a long time until I don’t have questions anymore and develop my own technique. I want to learn many other techniques first so I am asking what does it do, is it better or worse, good or bad. (leveling using the ink drop kinda tool)
Thank you for your helpful guide ^_^, but when I use this to leveling black/white areas, some says it’s not good and they show me this example, and tell me clean all the dust : http://wiki.yuriproject.net/_media/reveal_dust.png …
I don’t know how can I wipe out that dust like they do :(. Please, can you help me explain this kind of cleaning :(? I asked but no one replied to me :(.
Hello. Thank you so much for the tutorials! I’ve recently been accepted to a group as a cleaner. I learned almost everything I know about cleaning here so I dropped by to say thanks.
Thanks for the helpful tutorial. This is the best one I’ve read as of yet, and I plan to put it to use.
Also, are there any good editing programs aside from photoshop? Thanks again!!!
Thank you so much for this helpful tutorial! :)