Intro to the Pen Tool
Even though the Pen Tool is one of the best Photoshop tools for cleaning manga, it’s often overlooked because it’s somewhat difficult to get the hang of quickly. After some time, though, it will become intuitive, and you’ll wonder how you ever lived without it ^^
This guide will explain the fundamentals of the Pen Tool and the types of shapes you can make with it.
First, select the Pen Tool. This is what my Pen Toolbar at the top looks like:

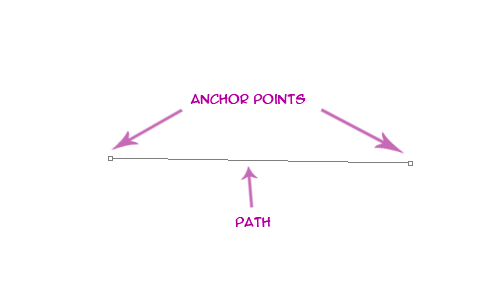
Now, click once on your page, and you’ll see a dot appear. Move the Pen to a new location and click again. Now you have a line with a dot at either end. The dots are called “anchors”‘ and the line is called your “path.”
[spoiler]
[/spoiler]
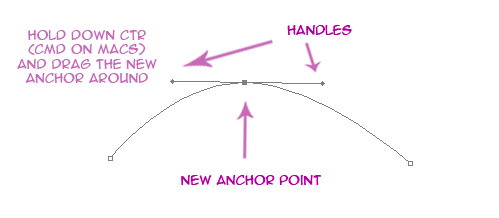
The reason we use the Pen Tool is to make nice, beautiful curves that you simply can’t do by hand. So far, though, our path is a line. To change that, first click in the middle of the path. That creates a new anchor. Hold down the CTR key (CMD key for Macs) and drag the new anchor point around. The line becomes a curve!!
Please note the line that extends from your new anchor point and the dots at the ends of that line. Photoshop calls these direction points and direction lines, but for my purposes here, I’m going to call them handles.
[spoiler]
[/spoiler]
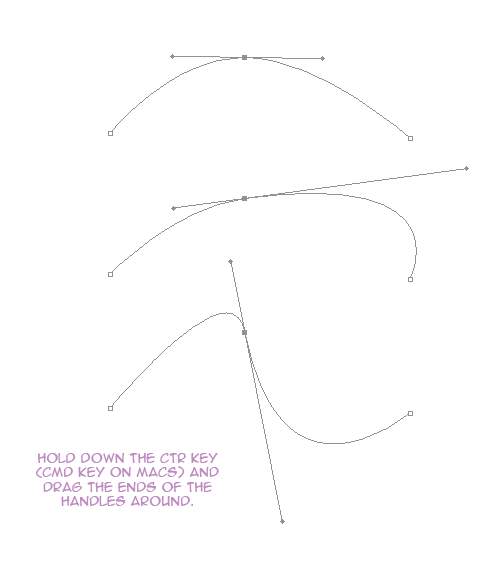
These handles control the roundness and direction of your curve, so play around a little and see what they can do! To move the handles, hold down the CTR key (CMD key for Macs) and drag the point at the end of the handle.
[spoiler]
[/spoiler]
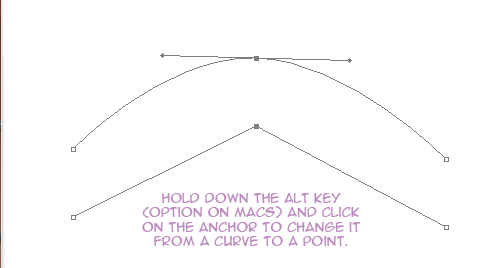
But what if you don’t want a curve? What if you want a sharp point? Glad you asked! After making a curve like before, hold down the ALT key (Option on Macs) and click on the middle anchor point. Note that the handles disappear because there is no longer any curve to control.
[spoiler]
[/spoiler]
But wait! What if we didn’t want to convert that path into a point?! What if we want our curve back? No worries. Just hold down ALT again (Option for Macs), click on the anchor point, and drag in any direction. Voila, your handles have appeared again!
———————————-
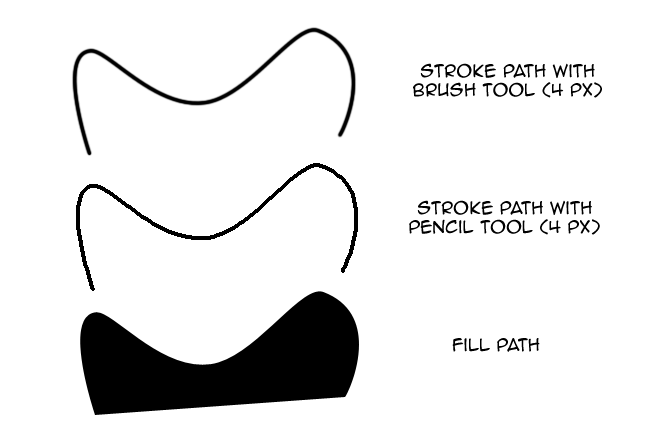
Okay, so we have our path, but now what? If you saved your page as a png right now, the path wouldn’t show up. That’s because you need to do something TO the path. For our purposes here and now, we’ll just worry about “Stroke” and “Fill.”
Stroke means you draw a line along your path.
Fill means you color in the area inside your path. If your path does not connect at one end, Photoshop will automatically finish the shape.
Once you have the path you want, right click to bring up the menu. From here, you can choose to “Stroke path” or “Fill path.” If you stroke the path, you can choose which tool will trace your line. I recommend the Brush Tool because it is anti-aliased. Make sure you have your Brush Tool setting at the width you want to stroke the path with. You might have to select the Brush, change the width, and then go back to the Pen to stroke.
[spoiler]
[/spoiler]
So to sum this section up:
- Clicking with the mouse creates anchors.
- Holding down CTR while clicking lets you drag things around. (CMD for Macs)
- Holding down ALT while clicking on an anchor converts it from a curve to a point or back again. (Option for Macs)
- Right click and choose “Stroke” or “Fill”
Once you feel comfortable with making these basic curves, let’s move on and see how we actually use the Pen Tool for cleaning.
I’ve mastered Pen Tool, and curving lines just now and begin to use it few hours, maby around 5-6… This tutorial is the real stuff, for the newbs like me I suggest you to read everything carefully, and its easy… lol personal favourite… curves are just godlike, lol i did a hair with the pen curving and then gradient and film grain…. superb!~
I’m so glad it helped! I had trouble with the Pen Tool at first, but now I absolutely love it.
The pen tool tut is great :D
It really helped me out :)
thanks chiresakura
Glad you found it helpful! Pen tool is absolutely key for good redraws :P
Hi, everything works, but whenever I hold Alt and click the middle achor, it just does a duplicate path that I can move around, no straight line. Any idea why? :)
Ok, sorry, don’t mind my last post, I have two Alt keys, and they do different things…
Sorry about this double post.
Great tutorials! :D
I’m glad you’re finding the site helpful! I’ve never seen a keyboard with two Alt keys before, but I’m going to look into it now that you’ve mentioned it. Sounds like it could be useful :D
I’m grateful to those who write detailed tutor for us newbies like you Chirasakura!
By the way, my two Alts work the same to the curves!
Great site. I’ve been trying to learn how to clean for HQ releases for some time now, and finally decieded to learn the #&*@& pen tool. After an hour of trying to make a simple face (lol) i found your tutorial and life was never the same again! XD
Thnx for ALL the great tutorials here.
BTW M7 releases make me wanna cry. They are too damn good :(
The way I present the pen tool here is the way it was taught to me. I had an ‘AHAH’ moment where it all finally clicked into place. I’m happy to pass the info on ^_^
And thanks for the M7 compliment. You’re always welcome to come learn how to clean for us XD
I was a newbie once, too!
Thanks for the tutorial. Long time ago I really hate Pen Tool because of its difficulty but now it was very easy to get hang with. I can make curves with no effort at all. Without you chire maybe I doesn’t know how to use Pen Tool forever. 2 thumbs up for you. ;)
Wow! I was trying to do the level 1 in the Maximum7 Cleaning Academy. I got stuck in the border tutorial (as part of level 1). I can’t find the pencil tool, but I found the pen and I have absolutely no idea how to use it. Glad I ventured here in your site and found this photoshop tutorial. This training for cleaning is my first time to actually use photoshop. (When I use it, I always go to filters, the only option that makes sense to me – before.) You are a lifesaver. Thanks chiresakura!
I am really glad i checked out your site and went through the tutorials. I was wondering if the pen and pencil tool are the same, and found out that they are not. I also found out where the pencil is. I’m so noob. lol. But, I’m having fun learning. So, thanks again. :)
LOL glad you’re having fun! Photoshop can be intimidating when you don’t know where to start, but it really helps having a goal (like cleaning manga)!
Is the pen tool required for cleaning? because i only have elements which doesn’t have the pen tool.
It largely depends on what you want to clean, how well you want to clean it, and the quality of the raws. If you plan on doing any extensive redrawing of lines, then the Pen Tool is a must. If you’re just doing some basic black inking, speck checking, and simple clone redraws, then you don’t need the pen at all. I’m not sure what features are available in Elements and which aren’t, but you could probably poke around GIMP (free image editing software) for the few things that Elements might not have. Good luck!
I’m a trainee at M7 and currently stuck at level 3, not knowing how to redraw those pesky black lines in Orihime’s hair. This tutorial helped me come to basic grips with the pen tool.
Thanks Chire-san. This tutorial is a life saver for noobs like yours truly. Cheers!
Chiresakura-san!!! This is totally the best tutorial ever! I’ve read so many tutorial and yet nothing is to compare to this~ So simple and so easy to comprehand and yet complete~~ Thank you so much Chiresakura-san
Is this normal? When I right click the fill and the stroke options are not available.
With the pen tool selected, look at the toolbar at the top. On the left at the top are three icons: the first is a square, and when you hover, it says Shape Layers. The second has a pen nib in the center and is Paths. Make sure the icon for Paths is selected. If that didn’t help, you’ll have to post a screenshot so I can take a look ;)
Hey, I’m having a trouble when I want to stroke path using the brush tool. The color that comes out is grey. I’d already make sure to set the color picker to black, but still it comes out grey. Any idea on what did I do wrong?
Hmm… usually when that happens to me, I accidentally set the opacity of the layer to 50% or something. You can set the brush tool’s opacity, too, so check to make sure everything is at 100%. Otherwise, you’ll have to send a screenshot so I can see what you’re talking about ;)
OMG, I can’t believe it is that simple. I didn’t know I can also change the opacity of the brush. I sounded like a total noob now :( Anyway, thank you for answering my question! You’re a big help!
You can also move the curves around using the keyboard arrows instead of ctrl+dragging (you don’t even need to press ctrl).
Wow. This is invaluable stuff! Pen tool has been a real mystery to me, but this is exactly the kind of information I needed to start wrapping my mind around this stuff.
Thank you so much!
Your tutorials are easier to understand than any youtube I have watched..Thanx ^v^
I’m having a problem sorry. when I use the pen tool and make a line, where I start is automatically becomes the middle of that line. I checked the pen settings and set them like yours. Buts still going weird T^T